
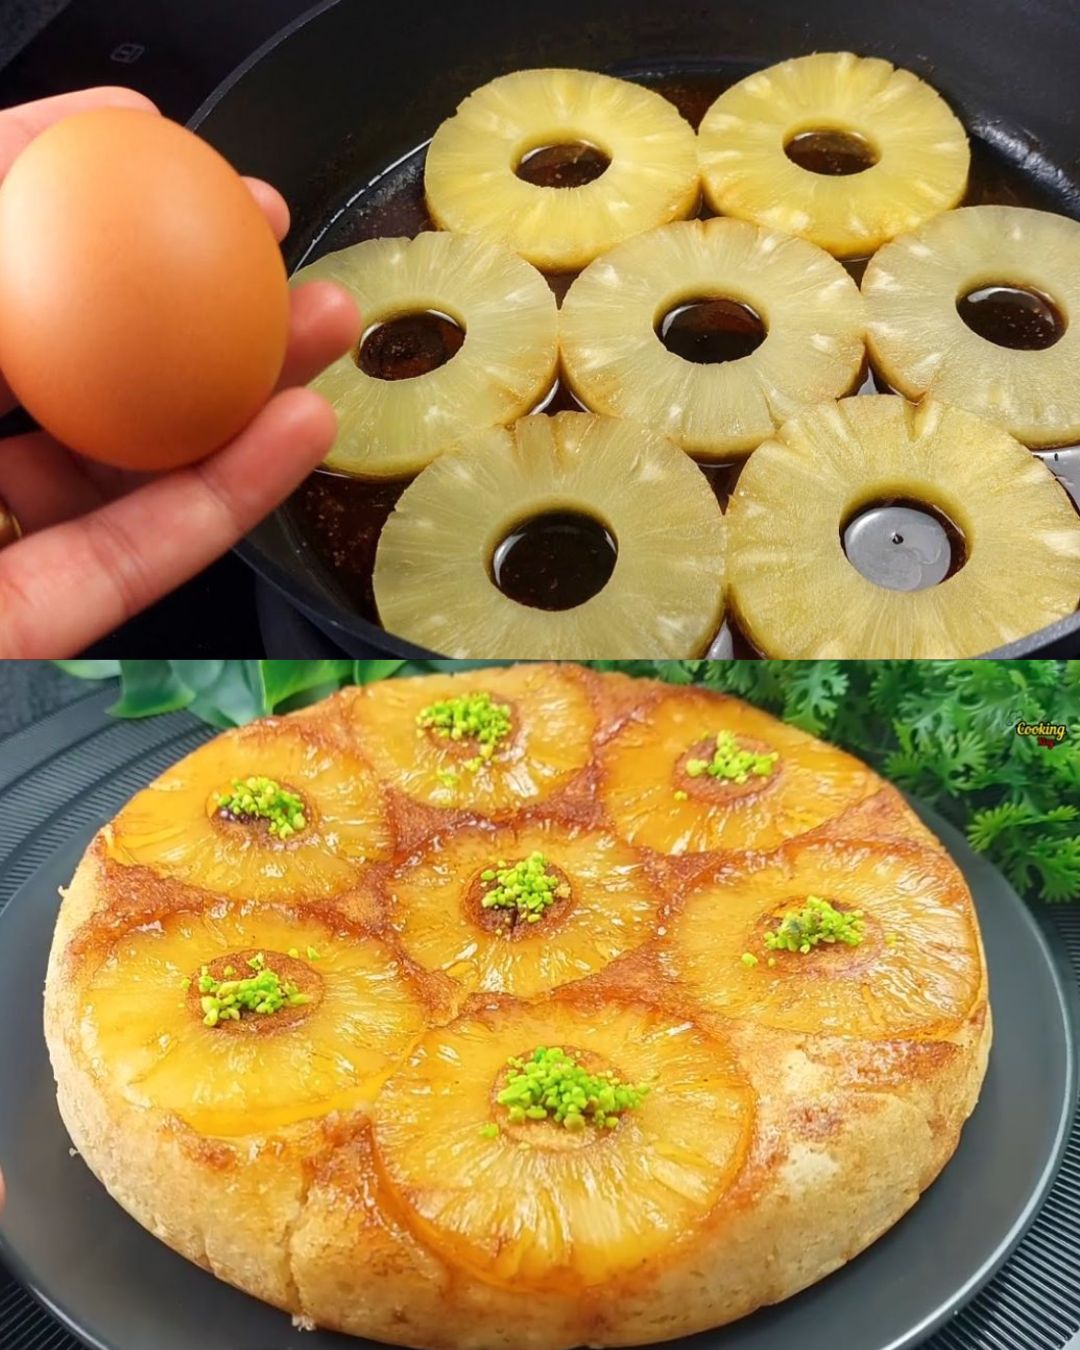
Prepare the Pineapple Layer:
In a microwave-safe dish or a large frying pan, melt 1 tablespoon of butter.
Sprinkle 1 tablespoon of sugar over the melted butter.
Arrange 7 pineapple slices in syrup on top of the butter-sugar mixture. Optionally, place a candied cherry in the center of each pineapple slice.
Make the Dough:
In a mixing bowl, whisk together 1 egg and 50g sugar until well combined.
Add 50ml oil and 100ml milk to the mixture and stir until smooth.
Gradually add 160g flour and 8g baking powder, mixing until you get a smooth batter.
Combine and Cook:
Pour the batter over the pineapple slices, spreading it evenly.
If using a microwave: Cook on high for about 5 minutes, or until a toothpick inserted into the center comes out clean.
If using a frying pan: Cover and cook on low heat for about 10-12 minutes, checking occasionally to prevent burning, until the cake is set and a toothpick comes out clean.
Serve:
Let the cake cool for a few minutes before inverting it onto a plate.
Enjoy your delicious Pineapple Upside-Down Cake!
Serving Suggestions:
Serve with a dollop of whipped cream or a scoop of vanilla ice cream.
Pair with a cup of tea or coffee for a delightful afternoon treat.
Cooking Tips:
Ensure the butter is fully melted before adding the sugar to create a caramel-like base.
Check the cake frequently if using a frying pan to avoid burning.
Let the cake cool slightly before inverting to ensure it holds its shape.
Nutritional Benefits:
Pineapple: Rich in vitamins C and B6, manganese, and antioxidants.
Milk: Provides calcium and vitamin D for bone health.
Eggs: Offer high-quality protein and essential nutrients.
Dietary Information:
Contains dairy and eggs
Not suitable for gluten-free diets (contains flour)
Nutritional Facts (per serving, based on 6 servings):
Calories: 250
Protein: 4g
Carbohydrates: 34g
Fat: 12g
Fiber: 1g
Sodium: 150mg
Storage:
Store leftovers in an airtight container at room temperature for up to 3 days.
Refrigerate if you prefer a colder dessert; consume within 5 days.
Why You’ll Love This Recipe:
Quick and Easy: Ready in just 22 minutes, perfect for when you’re short on time.
Deliciously Sweet: The caramelized pineapple and buttery base create a mouthwatering flavor.
Versatile: Can be made in a microwave or frying pan, adapting to your kitchen setup.
Classic Appeal: A timeless dessert that’s always a hit with family and friends.
Conclusion:
This Pineapple Upside-Down Cake is a delightful and quick dessert that brings a touch of tropical sweetness to your table. With its caramelized pineapple and fluffy dough, it’s sure to become a favorite in your recipe collection. The ease of preparation and the rich flavors make it a perfect choice for any occasion. Treat yourself to this classic cake and enjoy the delicious results!
Frequently Asked Questions:
Can I use fresh pineapple instead of pineapple slices in syrup?
Yes, but you’ll need to cook the pineapple with some sugar and butter to achieve a similar caramelized effect.
What if I don’t have a frying pan or microwave?
You can bake the cake in a conventional oven at 350°F (175°C) for about 20 minutes, or until a toothpick comes out clean.
Can I use a different type of fruit?
Absolutely! You can use peaches, pears, or even apples as alternatives.
How do I make this recipe gluten-free?
Substitute the flour with a gluten-free flour blend.
Can I reduce the sugar in this recipe?
Yes, you can reduce the sugar to suit your taste or dietary needs, but it might affect the caramelization.
Can I make this cake ahead of time?
Yes, you can prepare it in advance and store it at room temperature or refrigerate it.
How can I make the cake more flavorful?
Add a teaspoon of vanilla extract or a pinch of cinnamon to the batter for extra flavor.
What can I use instead of milk?
You can use a dairy-free milk alternative like almond or oat milk.
How do I know if the cake is done without a toothpick?
The cake should be set in the center and have a golden-brown color on top.
Can I freeze the cake?
Yes, you can freeze it for up to 2 months. Let it cool completely before wrapping tightly in plastic wrap and foil.
